
What can we help you with?
Clipchamp Video Editor
About
Clipchamp is Microsoft’s primary video editing program. (Former Microsoft apps included Video Editor and Microsoft Story Remix.)
Clipchamp is a user friendly, drag and drop, video editing software that comes with a library of stock images and clips, sounds and transitions – and can be upgraded to premium for more features and expanded media library. It will also integrate with the Google suite, Microsoft OneDrive, Zoom, TikTok, YouTube and more!
Clipchamp allows you to cut, trim, crop, rotate, split, loop, zoom, speed up/slow down, add or remove audio and even add filters and transitions. It also allows you to record cameras and screens, and edit green screen video.
Read on to learn more, or visit Microsoft’s Clipchamp help and learning support site for guides and tutorials for using Clipchamp.
Where to Access Clipchamp
The Clipchamp app is available for install:
- Download for Windows (will need to launch to Windows App store once on the site)
- Download for Chromebook
Available online in the Edge or Chrome browser
Clipchamp is now available via a browser (on Windows or Mac) through Stream in our Microsoft 365 account!
Before you get started, check to Make sure Clipchamp works well for you.
Step 1: Sign-in
To access Clipchamp, you have two choices:
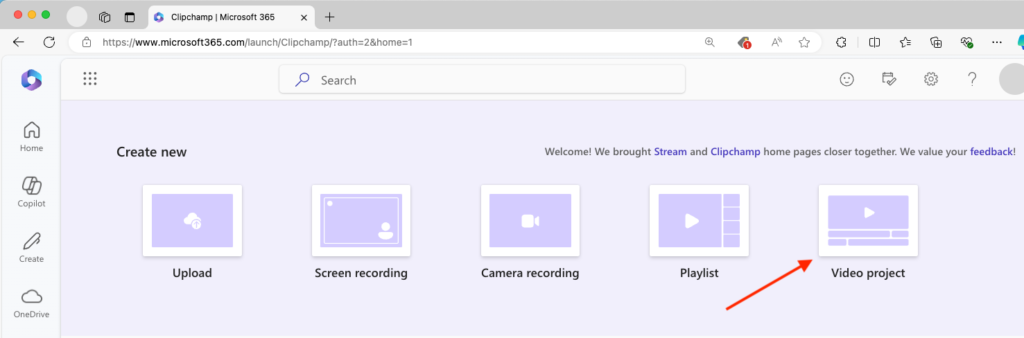
a. Visit https://office365.wooster.edu/ and login with your College credentials. From the app switcher (waffle), select Stream. Select the “Video project” option.
b. Visit clipchamp.com directly at Sign in | Clipchamp where you’ll need to sign in to access all the editing features. Instead of creating a new account, you can quickly log in using Sign in to ClipChamp for work or school accounts with your existing email ID from The College of Wooster.

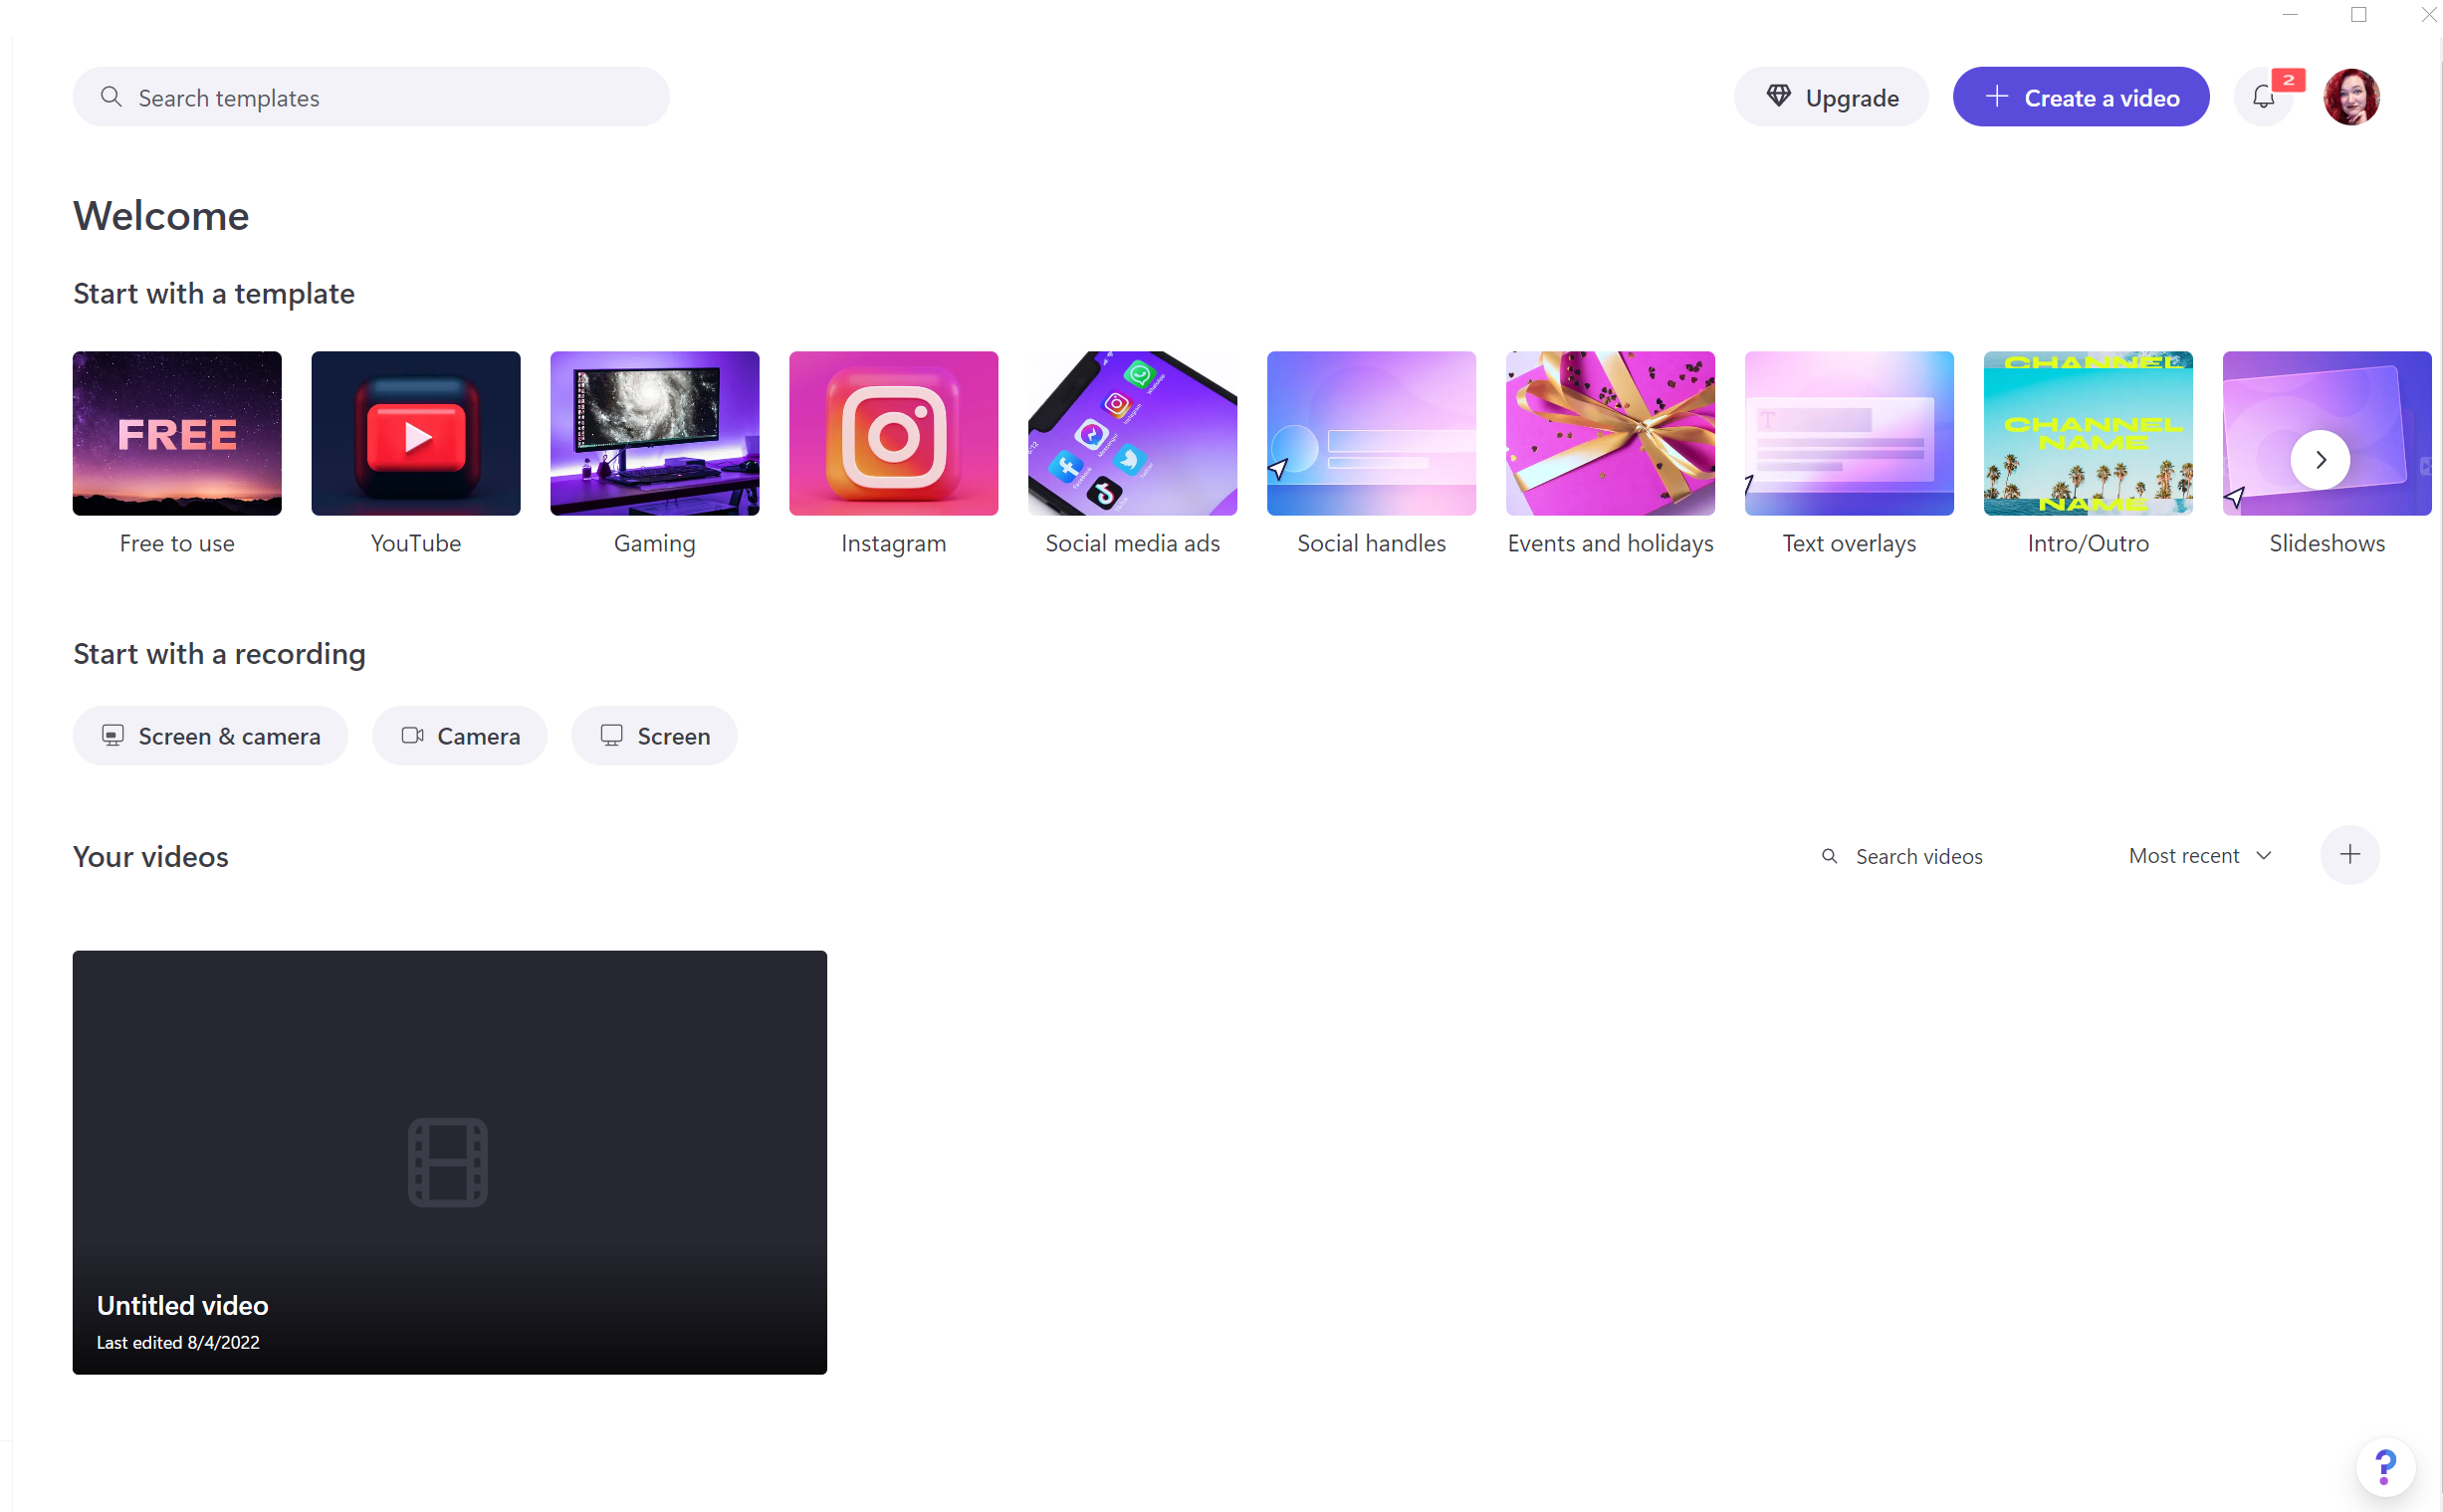
Step 2: Choose How to Start Your Project
Once logged in, you have two ways to begin:
Option 1: Start with Stock Clips
For further support: How to add stock videos to an editing project
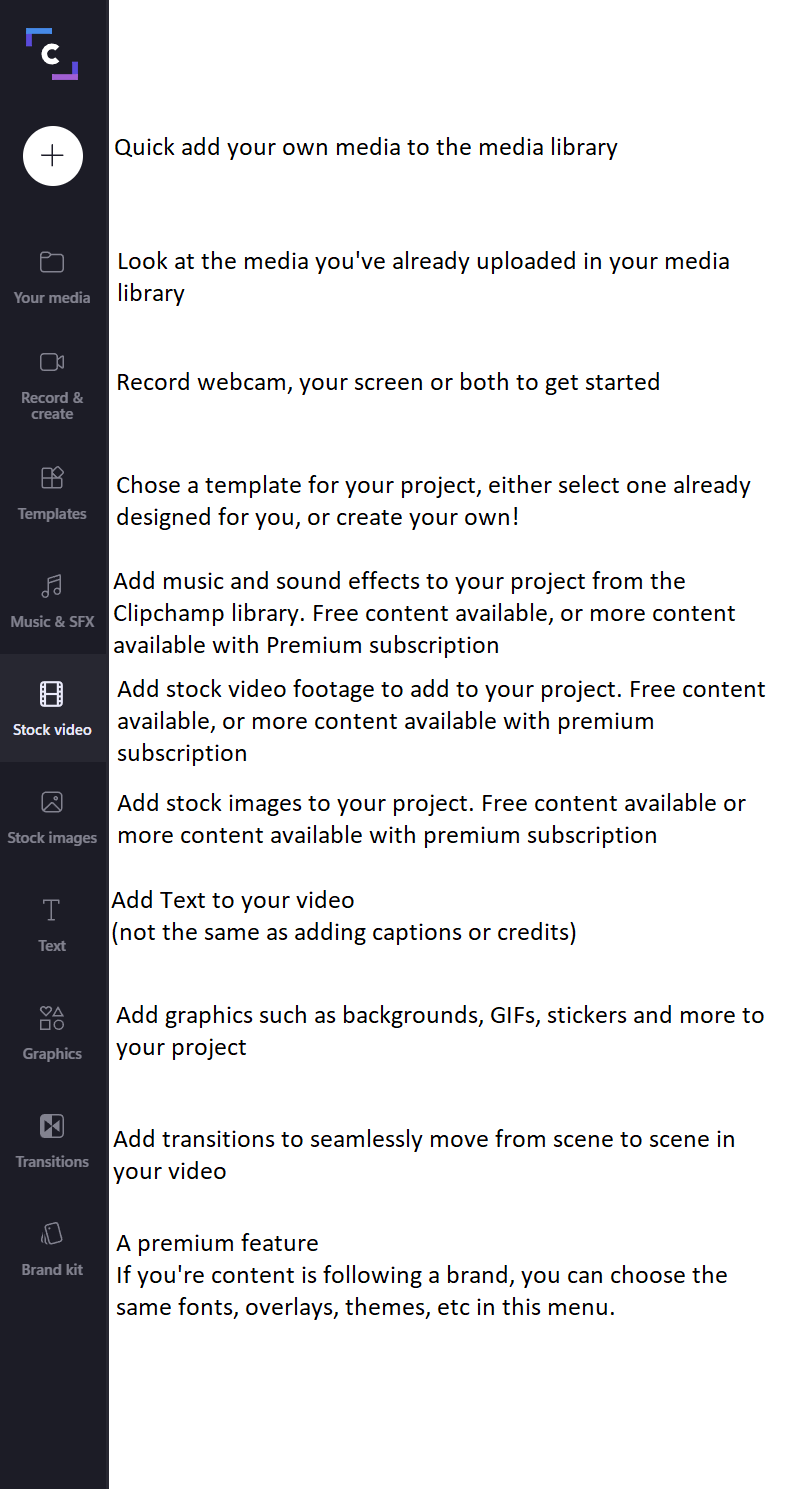
- Click “Stock video“ on the left toolbar.
- Browse thousands of free and premium stock videos, images, and audio clips.
- Use the search bar to find clips related to your project (e.g., nature, technology, business).
- Drag and drop your selected stock clips directly into your Media Library or Timeline.
- Combine, edit, and customize the clips to create your own unique video!
Option 2: Start with a Recording
For further support: Record video
- Click “Record & create” on the left toolbar.
- Choose from:
- Screen and Camera (capture your desktop and yourself)
- Webcam (film yourself) How to record a webcam video
- Screen (for tutorials or presentations) How to do a screen recording
- Your recording will appear in your media panel ready to edit.
Step 3: Edit Your Selected Video
Clipchamp’s editor is intuitive — here are some basics:
- Cut/Trim: Select the clip, drag the edges to remove unwanted parts.
- Split: Use the scissors icon to split a clip into sections.
- Crop & Resize: Click the clip → “Crop” to adjust frames or fit different aspect ratios.
- Rotate/Flip: Rotate or flip clips as needed under Transform options.
- Filters & Color Adjustments: Apply visual effects or tweak brightness, contrast, and saturation.
- Speed: Speed up or slow down clips using the Speed panel.
Step 4: Add Audio and Text
- Add Music or Sound Effects: Drag audio tracks from Clipchamp’s royalty-free library (Music on toolbar) or upload your own.
- Voiceovers: Record directly within Clipchamp by selecting Record and Create, then click on Webcam, furthur click on Audio to record your speech(bottom of the screen)
- Add Text & Titles: Insert animated text or captions using the Text tab.
Step 5 : Add Subtitles and AI Voiceovers
Subtitles (Captions)
Step 1 : Enable Auto-Captions
- Click the captions icon in the video preview or go to the Captions tab > Transcribe Media.
- Select your language and enable profanity filtering (optional).
- Click Transcribe Media to generate subtitles.
Step 2 : Edit Subtitles
- Fix misspellings by clicking the transcript and typing corrections.
- Customize appearance (font, color, size, alignment) via the Text tab in the Properties panel.
Step 3 : Save & Export
- Download an SRT file (Captions tab > Download Captions).
- Preview your video, then Export in your preferred resolution.
Step 6: Enhance with Effects and Transitions
- Transitions: Drag and drop fades, slides, and wipes between clips for smooth movement.
- Overlays & Stickers: Add fun overlays, stickers, or GIPHY animations from the graphics tab.
How-To Do It All Then??
Clipchamp has a Training site to help you get started with all of the features that it offers, but below you can find the basics to get your started!
Getting Started
Here are some basic ClipChamp features Video Editor Features
When you login clipchamp you’ll need to decide how you want or need to start a project. You can…
- Start with a Template: begin your project with a premade template from the Clipchamp library, or create your own and start building your own content for presentations, social media, and more!
- Start with a recording: Don’t have a video yet? Start by recording your screen, your webcam view, or both at the same time! Great for presentations!
- Start with your own Media: If you already have your prerecorded video, just hit “Create a video” in the top right corner and then drag and drop your videos into the media library so that you can start building your video right away!
Side Toolbar
Exporting your video
Finished with your video? Just hit the Export button in the top right corner, and then choose how you would like to export it! You can choose quality levels based on the platform the video will be hosted on.
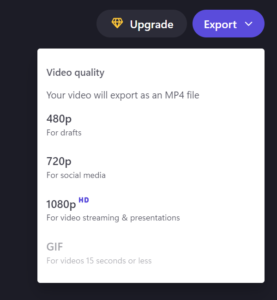
Note: If you used effects, sounds, stock photo or images, or any feature that requires the premium version of ClipChamp, sections of your video will have a water mark across it and ClipChamp will notify you before you export the video. However, videos that do not utilize the premium features will have no watermark or indication of the program used to edit the video.