What can we help you with?
OneDrive
What is OneDrive?
OneDrive is Microsoft’s service for hosting files in the “cloud” (much like Google Drive or Dropbox). As part of your Office 365 account provided by the college, OneDrive for Business lets you update and share your files from anywhere and work on Office documents with others at the same time.
Features
- 1 TB of storage space on the cloud per person
- Ability to sync files across devices and to access them from anywhere, online or offline
- Files are automatically saved as you edit them online
- Files can be created on a variety of applications online as part of the Office 365 suite including Microsoft Word, Excel, PowerPoint, and OneNote
Who Can Access My Files?
- The files stored in the OneDrive can be kept private or can be shared with others.
- You can grant view-only or edit sharing access.
- You can generate a “Share” link for “People in the College of Wooster with the link” to use or you can select specific names or email addresses of individuals.
- As part of the College of Wooster email system, a built-in directory of all Wooster email addresses makes sharing even easier.
- If a folder has been granted “People in the College of Wooster with the link” access, any files inside that folder are accessible to anybody with a @wooster.edu email address.
For more information, see our handout Uploading and Sharing Files in OneDrive or Microsoft Support’s Intro to OneDrive.
To Access OneDrive Online:
OneDrive can be found in the online Office 365 application.
- Log in to Microsoft 365 (visit email.wooster.edu and log in with your College username and password).
- Click on the app switcher (waffle icon) and select OneDrive from the list.
To Access OneDrive on your device using the OneDrive App:
Users can access and sync files via desktop or mobile device by installing the OneDrive application onto their computer or mobile device. The app will allow the user to access the information stored and shared in OneDrive without the use of an internet browser.
The OneDrive app is free to download. Visit our OneDrive App article for more information.
Adding an Account to OneDrive
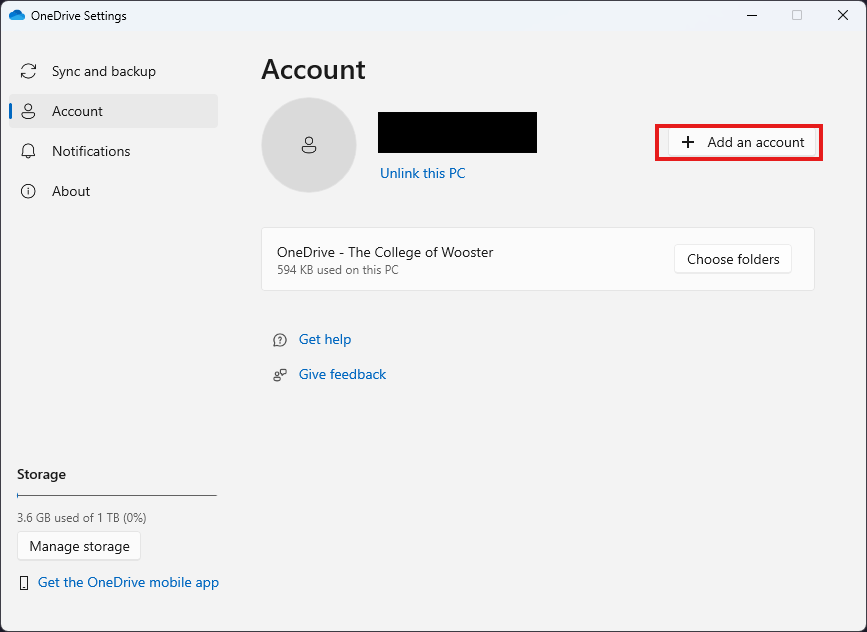
During Windows first-time setup, you might have created a OneDrive folder with your personal Microsoft account that isn’t necessarily linked to your Wooster account. To remedy this, you can add an account in OneDrive settings.
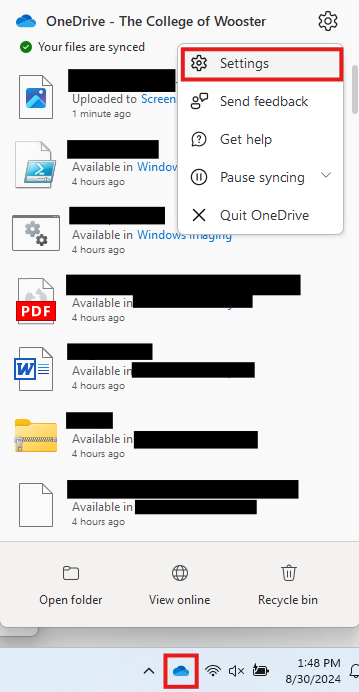
Windows: Right-click on the OneDrive icon in the system tray and click on Settings. Navigate to Account and click Add an account. Enter your Wooster credentials and sign in.


Mac: Control+Click on the OneDrive icon in the menu bar. Select Preferences and then Add an Account. Enter your Wooster credentials and sign in.
The New OneDrive

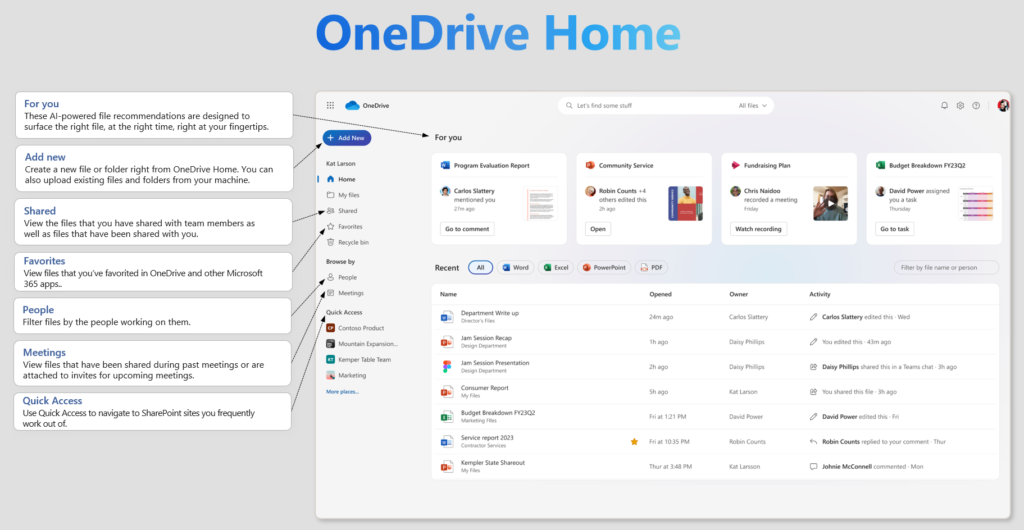
OneDrive has recently updated by improving the user interface and adding new experience-oriented features. For a full overview of this update, visit the official OneDrive unveiling document or watch this YouTube video.

New Features
- The “For You” area is an AI-driven section displaying recently opened, shared, or edited files based on user activity and network connections.
- The new “Add New” button has enhanced functionality for creating folders, uploading files, and generating various types of office documents from a single button.
- Sharing has been overhauled with a dedicated section displaying files shared with the user, offering quick filtering and search options. There have also been improvements and tweaks to the sharing dialog with options to specify editing permissions, customize sharing settings, and easily share links via Outlook.
- A key feature is the inclusion of new pivots that allow users to browse files based on collaboration with specific individuals or files shared during meetings.
- It is now possible to directly access Teams and associated channels, providing seamless integration between OneDrive and Teams.
Refer to the video on how to use any of these features.
