
What can we help you with?
Audacity
Audacity is a free audio-editing application that works on Windows, Mac, and Linux desktop computers or laptops. There is no mobile version of Audacity available. See Installation directions below.
On campus, PCs and Macs with Audacity are available in Andrews CoRE and the Andrews Digital Studio. Student assistants are available to help you.
Audacity Project Examples
Audacity can be used to
- record narratives or interviews.
- edit music or sounds for use with video.
- help language students record themselves speaking a foreign language for assignments.
- convert audio from analog sources such as cassette tapes to digital media such as CDs or digital audio files such as mp3s.
Audacity Project Window
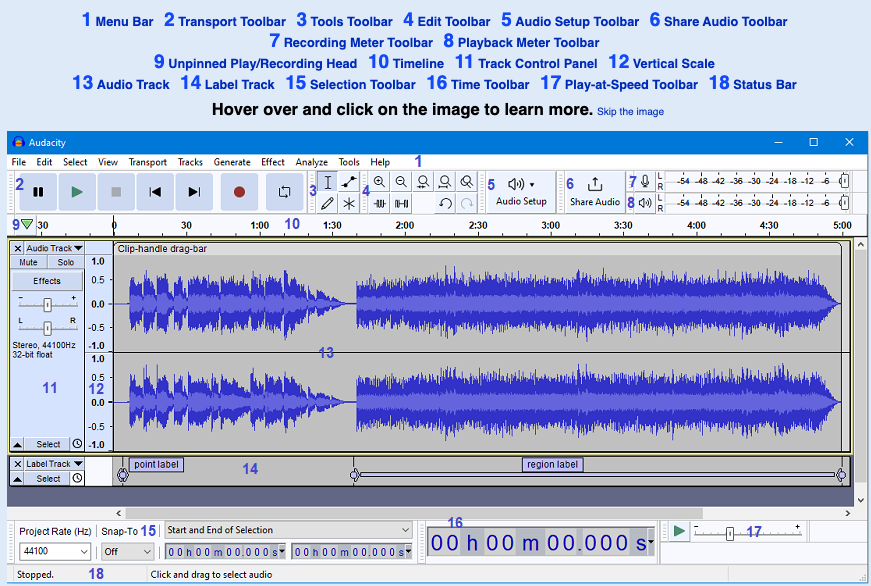
Visit the Audacity manual for an interactive version of the Project window and more screenshots.
Online Resources for Audacity
See the What’s New in Audacity 3.6 YouTube video.
- Audacity Getting Started
- Audacity Tour Guide
- Audacity Toolbars Overview
- Audacity User Manual
- Audacity Support How-tos and tutorials
- How to Record in Audacity (Stream)
- Audio for Projects and Assignments
Software Installation
Download Audacity (for Windows, Mac, and Linux).
You will have options for software install packages:
- For the simplest install, you may select the Mac Universal or Windows 64-bit installer.
- Audacity will “recommend” the installer via Muse Hub, but this is not necessary. Muse Hub includes free apps and sounds and effects for composing, producing or performing. The installer will prompt you to create an online account.
- See Audacity’s Frequently Asked Questions
- The Audacity install allows export of MP3 and WAV file types. For other types, see Installing FFmpeg below.
Installing FFmpeg to Export other file types
- The optional FFmpeg library allows Audacity to import and export a much larger range of audio formats including M4A (AAC), AC3 and WMA and also to import audio from most video files. Because of software patents, Audacity cannot include the FFmpeg software or distribute it from its own websites. Please see Installing FFmpeg on the Audacity Support site for FFmpeg installation details.
- Older versions of Audacity for Windows and Mac and the current for Linux require(d) you to install the LAME encoder in order to export your Audacity file as an mp3. For those versions, visit download the LAME encoder.
How-To
See our Audacity Workshop post for agenda and feature details.
There are four steps to make your recording:
- Record your audio.
- Edit your project.
- Export your Audacity track as an MP3 file.
- Share the MP3 file
Step 1. Record Your Audio
(See our Podcasting Tools article for more details on audio recording equipment and including the Sound Studio in the Digital Studio in Andrews Library)
- Open Audacity, then save your project, naming it what you want.
- Begin recording by pressing the Record button and begin speaking. You will see sound waves appear in a track in the Audacity window as it records.
- To pause the recording and begin recording again on the same track, press the Pause button.
- To stop the recording and begin recording on a new track or a new region, click Stop.
- Press Play to listen to what you have recorded.
- To save your Audacity project for further editing, from the File menu choose “Save Project” and see the Save vs. Export note below.
Step 2. Edit Audacity Track
- If you are editing an existing sound file, select “Import Audio” from the project menu, and browse to your file to import it into Audacity. The optional FFmpeg library allows Audacity to import a broader range of file types.
- To listen to what you have recorded, click your mouse in the track to show the cursor and press play. Audacity will play the track starting at the location of the cursor. If an area of the track is highlighted, Audacity will play only that area.
- If you have multiple tracks, they will all play simultaneously unless you select “solo” or “mute” in the track settings (located to the left of each track).
- To edit a track, select the desired portion by highlighting it or click on the track settings box to select the entire track. Cut, Copy and Paste are found in the Edit menu and other common effects are found in the Effect menu (If your project is paused in play mode or paused in record mode, you will not be able to edit).
Step 3. Export your Audacity Project as an mp3 or wav file
**NEW in Audacity version 3.2 is a Share Audio Toolbar which enables you to share your audio online with others on the audio.com website.**
If you are satisfied with what you’ve recorded, you are ready to export the project to your computer as an audio file such as an mp3.
To export audio formats such as M4A and WMA, FFmpeg is required. Due to patent restrictions, FFmpeg cannot be distributed with Audacity itself. See Installing FFmpeg above.
- To export your project as a .wav or .mp3 file, from the File menu select “Export Audio…”
- In the window:
- Select the desired format such as mp3 or wav.
- Name your file.
- You have the option of adding metadata such as track title, artist, etc.
- Select the ‘Export” button.
Step 3. Share the file
To share the file (to your professor, for example), you have a few choices.
- The mp3 file should be small enough to attach to an email message
- Upload the mp3 file to OneDrive or as a file upload to Moodle
- If the mp3 file is too large, see our guides:
- Uploading and Sharing Files in OneDrive.docx which includes submitting the OneDrive share link to a Moodle Assignment with an online textbox enabled.
- Using OneDrive and SoundCloud for Audio Projects
Save vs. Export
Audacity makes a distinction between Save and Export.
- Save an audio project (for further editing) in Audacity project format which only Audacity can open
- Note: if you save an Audacity project by File > Save Project menu, it will create a file with the extension “.aup” and a folder with the name of your project and _data. For example, if your project was named “beats” and you selected ” Save Project,” you would end up with a file named “beats.aup” and a folder named “beats_data.” If you need to transfer your project, you must move both of these files.
- Export audio in formats like WAV and MP3 for use in other applications outside of Audacity
- If you have more than one track in your project, exporting as MP3 or WAV will mix all of your tracks into one MP3 or WAV file. Only use this option if your project is finalized. You will not be able to split the tracks up again once you do this.
- FFmpeg: The optional FFmpeg library allows Audacity to import and export a much larger range of audio formats including M4A (AAC), AC3, AMR (narrow band) and WMA.