
This post is intended to provide guidance and resources for students using Microsoft Word to format their Independent Student thesis document to meet department guidelines. Students using LaTeX to format their IS should visit the WooLaTeX site for information and to find the template.
Table of Contents
- Microsoft Word
- Formatting Resources
- Formatting Steps in Word
- Research Paper Style Guides
- Workshop Files
- Other Templates
- Other resources
Many of the links below are to LinkedIn Learning video tutorials. Login to LinkedIn Learning using your College credentials. Learn more about LinkedIn Learning.
Microsoft Word
- Resources below address using Microsoft Word as one’s word processing software.
- Students should ensure their version of Word is updated.
- All College users can download Microsoft Office with their credentials.
- Word is available for download for Windows and Mac.
- Not all features can be achieved using Word for the web (online) or the mobile app.
For additional support using Office 365
- OneDrive: Microsoft’s OneDrive training
- Microsoft Word training: Microsoft’s Word training, LinkedIn Learning: Word 2021, Tracking Changes, Managing Comments, Styles
Formatting Resources
- IS Department Handbooks
- Download our Senior IS Formatting Workshop handout and checklist to accompany the Steps below
- Watch our video tutorial of I.S. Formatting steps (in Stream)
- Watch our video Why Use the IS Template? (in Stream)
Templates
Download the Word document with filler text and replace the filler text with your text. You should avoid deleting (this could break formatting for page numbers and other hidden elements) and instead copy any text you already have and paste it into the template over the existing text using the Keep Text Only paste option. The formatting described below in the Formatting Steps directions has already been applied for you.
- IS Template Double-Sided (best for printing, follows standard publishing practices possibly inserting blank pages to start all sections on odd pages)
- IS Template Single-Sided (best for digital submission and OpenWorks)
- IS Template Double-Sided (Kauke cover) (same template, different cover page)
- IS Template Single-Sided (Kauke cover)
- Department of History template (bottom of post)
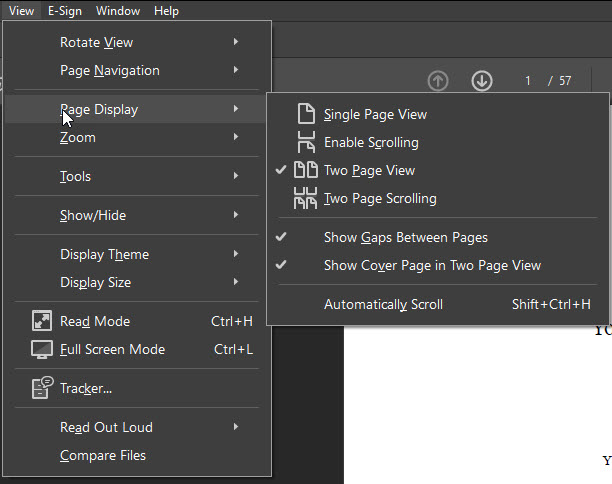
The Double-Sided IS Template has many hidden blank pages. You can see them by changing the view in Word or saving as a PDF and viewing the PDF (see Acrobat View Settings in Figure 1). There should be a blank page after the title page, after the abstract, after the acknowledgments, after the dedication, after the table of contents, after the list of figures, after the list of tables, and after the last page of some chapters. You should see that all new sections start on an odd page. For documents set up for back-to-back printing, this is what we should expect (new sections always start on the right (odd page), page numbers on the outside margin (alternate when viewed on screen), etc). If you are not to do back-to-back or not required to print your IS, then consider using the single-sided version.
Formatting Steps in Word
- Show formatting marks: On the Home tab, in the Paragraph group, choose Show/Hide
- Show the Navigation pane: To open the Navigation pane, press Ctrl+F, or click View > Navigation Pane
- Indenting paragraphs and Creating a hanging indent
- Create a Text style based on no style with a first line indent and required line spacing and apply that style to all paragraph text in your document.
- Create a Bibliography or Works Cited style based on no style with a hanging indent and apply that style to your Bibliography or Works Cited
- Styles Apply styles Customize styles
- Set the chapter titles as Heading 1, subsections as Heading 2, sub-subsections as Heading 3 so that you can insert an automatic table of contents
- Insert images: inline vs. text wrap. Recommended: text wrap with Top and Bottom Insert and arrange an image
- Insert captions for images and group each caption with its image.
- Save tables as images and insert them into your IS just as you did an image, except choose Table instead of Figure for the caption label.
- For figures and tables that need to be styled according to APA 7 guidelines refer to our video walkthrough.
- Breaks: page breaks and section breaks
- Insert a page break before a new chapter
- Section Breaks
- Use Section Break Next Page (at the end of the page before the page where formatting switches) if you need a page break
- Use Section Break Continuous (if you already have a page break)
- if you need to change page number placement (center footer vs header outside)
- if you need to change page number style (roman vs arabic)
- if you need to have a different running head for each chapter (for example the chapter title is the running head for each chapter. You will most likely need to unlink the header from the previous section)
- Deleting sections breaks can be difficult. Turn on non-printing characters/Show formatting marks. On Mac, click at the beginning of the section break, hold the shift key, press the right arrow key once, press the delete key.
- Table of Contents
- Use insert Table of Contents to insert an automatic table of contents (make sure the options for the TOC are set to display all the heading levels used in the document)
- TOC Tips and Tricks
- Table of Figures/Tables
- Define a Figure caption style and Table caption style to use for captions on Figures and Tables
- You must insert captions on Tables and Figures in order to add them to the respective List.
- You can then insert a List of Figures and List of Tables using these styles
- Header/Footer
- Open the Header/Footer to insert page numbers…
- Page numbers including roman numerals vs. arabic numbers
- Add different page numbers or number formats to different sections (Word 2016 for Mac or Word 2016 for Windows)
- If you are printing double-sided, please review our suggestions.
- Margins
- Use mirrored to allow different inside vs. outside margins (larger inside margin for double-sided printing and binding) if printing double-sided. Otherwise, set the margins to an inch on all sides or whatever your department guidelines specify.
- If you need to have a lead-in style header (the header is part of the paragraph) then highlight the words that serve as the header and apply the appropriate header (Header 3 or 4 usually). This will style the entire paragraph. Now define a new character style called Regular text which has the font and font size of the rest of the document. Select the extra text that has been styled as part of the heading and apply the Regular text style. This will add a bunch of extra text to the Table of Contents that you will need to delete.
- If you need to print back-to-back make sure to set the margins to inside and outside (mirrored) and also make sure you use Odd Page Section breaks at the end of chapters and sections (Acknowledgements, Abstract, Table of Contents, etc.)
- For numbering figures and tables within a chapter you first need to number your chapters. This video walks through creating a new numbering style that can be applied to your chapter headings.
- For changing footnote numbering behavior please refer to our video for modifying footnote settings
- To start footnote numbering over in each chapter you will need to put a Section Break (Next page) at the end of each chapter and modify the footnote settings to restart numbering in each section.
- To start footnote numbering over on each page you will need to modify the footnote settings to restart numbering on each page.
Editing
- Collaborate and edit Insert and edit comments
- Track changes Review comments and track changes
Equations
- Equation Editor Equations, symbols and objects
References
- Footnotes or Endnotes Create a Footnote or Endnote
- Bibliography or Works Cited Create a Bibliography or Works Cited section
- Caption
Research Paper Style Guides
How to Format a Research Paper: APA, MLA, and Chicago Styles
Workshop Files
Other Templates
Department of History Resources
- History IS Template [Put this file in C:\ Users\ [UserName] \ Documents\ Custom Office Templates on Windows or /Users/username/Library/Application Support/Microsoft/Office/User Templates/My Templates on OS X] When creating a new Word document you should be able to choose this template and your document will have all of the styles needed to format an IS for the History Department.
History IS Sections and styles to use
Title Page (Subtitle Style except for the Title which uses Title Style and use Layout> Space before/after to space out elements)
page break
Abstract (Front Matter Heading)
page break
Table of Contents (Front Matter Heading, use manual ToC and set the options to include Unnumbered Headings as level 1, Numbered Chapter Headings as level 1, Subsection Headings as level 2, Sub-subsections Headings as level 3, Appendix Headings as level 1)
section break – next page
Acknowledgements (Front Matter Heading, lower Roman page numbers)
List of Figures (Unnumbered Heading, lower Roman page numbers)
List of Tables (Unnumbered Heading, lower Roman page numbers)
section break – continuous
Introduction (Unnumbered Heading, Arabic page numbers)
section break – continuous
First Chapter (Numbered Chapter Heading, Arabic page numbers)
section break – continuous
Second Chapter (Numbered Chapter Heading, Arabic page numbers)
section break – continuous
…
First Appendix (Appendix Heading, Arabic page numbers)
Bibliography (Unnumbered Heading, Arabic page numbers)
Reference Style for references
Block Quote Style for Bibliography annotations
Caption Style for Figure and Table Captions (Set Wrap Text to Top and Bottom for figures and tables (make tables images) and numbering to include chapter number)
Set Footnotes to restart numbering with each section