
With Microsoft Forms, you can create surveys, quizzes, and polls that feature text, pictures and video. Others can respond using any web browser, even on mobile devices. As results are submitted, you can use built-in analytics to evaluate responses. Form data, such as quiz results, can be easily exported to Excel for additional analysis or grading. You can invite collaborators to view or edit the form and the results.
Microsoft Forms is available through our College Office 365 account.
Resources
Visit Microsoft’s support
- Microsoft Forms Get Started
- Microsoft Forms Quick Start
- Create a quiz with Microsoft Forms
- Create, edit, and collaborate on a form in Microsoft Teams
- Microsoft Forms Blog for updates to Forms
- Microsoft Forms YouTube playlist
To integrate Forms with other Microsoft apps
Visit our Forms Integration post for more details.
- To use Forms as polls in Microsoft Teams, see our ICYMI post.
- Add a Form to a specific time stamp in a Stream video
Agenda
- Please respond to My First Form.
- You will be prompted to log in to Office 365 with your College credentials.
- Here is a sample form with various question types for you to save to your Forms.
- Click here Types of Questions form
- Click the “Duplicate it” button
Logging in to Forms
Microsoft Forms is available through our College Office 365 account.
- Log in to the College of Wooster Office 365 via a web browser by either
- office365.wooster.edu
- click Email link at bottom of Wooster.edu -> email.wooster.edu
- Click the ‘waffle’ and select Forms (or Excel… see below) from the list of apps
Creating a form
(for individual users. To create a form that a Group can edit and manage responses, see below).
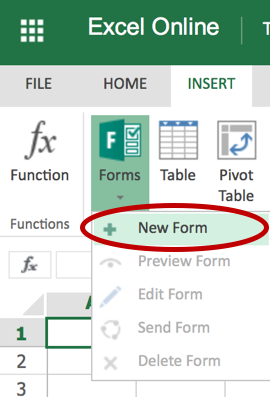
*Recommended* To host form results in Excel online so that new responses are continually updated and accessible online, start from OneDrive or SharePoint as described here or from Excel online:
- From the Office 365 “waffle,” select Excel
- Create a New blank workbook (Excel spreadsheet)
- In Excel online, go to the Insert menu > Forms > New Form
- A new Form will open with the title “Book” (you can change it)
(See further details below or visit this Microsoft support page.)
You can go to Forms in the Office 365 app switcher to create a form, but the Excel file with form responses will download to your computer and not be hosted in Excel online.
- From the Office 365 “waffle,” select Forms
- Under My Forms, select New Form.
- Enter a name for your form. You can also enter an optional description for the form.
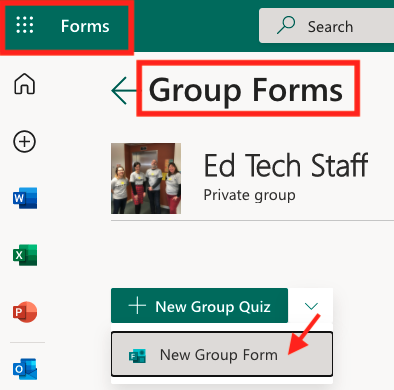
Creating a Form in an Outlook Group or Team
If you want to create a new form that can be edited by any member of the Group/Team and the results can be viewed by any member of the Group/Team, you have several choices:
- go to Forms and create a new “Group Form” OR move a form you have already created to the Group (watch this video or see below).
- go to SharePoint for your Group/Team > Documents > New > Forms for Excel

- go to the Group files online and create the Excel spreadsheet for the Form results first, similar to the process for an individual starting in Excel online:
-
- From the Office 365 “waffle,” select Outlook
- Select your Group
- Go to the Group Files
- Create a New blank workbook (Excel spreadsheet)
- In Excel online, go to the Insert menu > Forms > New Form
- A new Form will open with the title “Book” (you can change it)
The Excel sheet for the form results will reside in the Group Files called “Book” (you can change it)
Adding questions to a form
- Select Add Question to add a new question to a form or quiz.
- Click to choose to add Choice, Text, Rating, Date, Ranking, Likert, File upload, or Net Promoter Score questions or a Section. Select More question types
 for Ranking, Likert, File upload, or Net Promoter Score® question types.
- * File upload questions are only available for College users. A Form can be completed by any person, but a file upload requires College credentials.
- Select Preview at the top of the design window to see how your form will look on a computer or mobile device.
- Edit questions at any time by clicking a question in the Questions tab.
- Above the question
- Copy a question
- Delete a question
- Reorder questions
- Below the question
- allow Multiple answers (on a Choice style question)
- Require a response
- Enable a subtitle (provide instructions or clarification)
- Add branching
- On a Choice question: shuffle options or display as a Drop-down
- Above the question
- Updates save automatically.
Send a form to respondents
1. Open the form you want to send
2. Select Share in the upper right corner.
3. Under “Send and collect responses”:
4. Authentication
- Only people in my organization can respond
- Specific people in my organization can respond
- Anyone with the link can respond
- the response is anonymous
- if you want to collect identifying information, you would need to add a question(s) for respondents to enter their names
5. Send a form link to others
- Link
- QR code (print material, large presentation)
- Embed
- Mail (this will launch default email client software on the computer)
View form results
On the Responses tab
- Summary of form (# of responses, average time to complete, active status)
- Summary of each question (scroll down)
- Click “View Results” button to see individual respondents’ entries
- Open in Excel
Share forms
Collaborate
You can create and share a link to allow others to collaborate on a survey or quiz with you.
Go Share > under Share to collaborate > Get a link to view and edit.
- Can choose anyone, people in your organization, specific people in your organization.
Template
You can create and share a link to allow others to reuse surveys or quizzes you have created.
Go Share > under Share as a template > Get a link to duplicate. That link allows others to duplicate the form for themselves. Any responses to your form are not shared.
Share form results with others
- Download the Excel file (one time snapshot of results)
- Share the Excel file online in Office 365 *** Must create the form from Excel online ***
Copy your own form
The Copy and Move options have moved. Watch this video.
- At the main Forms screen (displaying your Recent forms), scroll down the page and select All My Forms.
- Find the form tile and in the upper right corner click … > Copy
Move your form to a Group/Team
If you’ve created a form or quiz, you can easily move it to a group so everyone in your group becomes owners of that form.
- At the main Forms screen (displaying your Recent forms), scroll down the page and select All My Forms.
- Find the form tile and in the upper right corner click … > Move.
- Select the Group/Team.
Advanced form features
In the upper right corner menu, click …
- Branching (select in each question)
- Settings
- Who can fill out this form
- Options for responses
- Accept responses (or close)
- Dates
- Shuffle
- Response receipts
- respondents can receive a receipt
- email notification